Most homeowners assume brick homes are almost maintenance-free. The truth is a little different.
While bricks can last for decades, the mortar joints between them slowly wear down due to moisture, weather exposure, and temperature changes. Once those joints begin cracking or crumbling, water starts moving into the wall system. That’s when small cosmetic issues can turn into expensive structural problems.
This is where tuckpointing becomes important.
Professional mortar restoration helps strengthen weak masonry joints, stop water intrusion, and restore the appearance of aging brickwork. Whether it’s a chimney, foundation, retaining wall, or exterior facade, repairing damaged mortar early can prevent major repairs later.
In this guide, you’ll learn:
• What tuckpointing actually is
• Common signs your home needs repairs
• Why mortar joints fail over time
• Average tuckpointing costs
• DIY vs professional repair
• How to protect brickwork long term
What Is Tuckpointing?
Tuckpointing is the process of removing damaged mortar from between bricks and replacing it with fresh mortar. The goal is to restore both the strength and appearance of the masonry.
Over time, mortar naturally deteriorates faster than brick. Moisture, freeze-thaw cycles, and aging slowly weaken the joints until cracks and gaps begin to form. Once water enters those openings, the damage spreads deeper into the structure.
Professional brick mortar repair helps:
• Prevent moisture damage
• Improve structural stability
• Extend the lifespan of brick walls
• Restore curb appeal
• Protect against loose bricks and cracks
Tuckpointing is commonly used on:
• Brick homes
• Chimneys
• Foundations
• Retaining walls
• Historic buildings
• Commercial masonry structures
Why Mortar Damage Gets Worse So Quickly
One of the biggest mistakes homeowners make is ignoring small mortar cracks because they don’t seem serious at first.
The problem is that masonry damage spreads quietly.
A tiny crack may allow rainwater to enter behind the brick surface. During winter, that trapped moisture freezes and expands, creating even larger cracks inside the wall. Over time, bricks loosen, mortar crumbles, and interior water damage can begin appearing inside the home.
By the time most homeowners notice visible issues, the damage has often been developing for months. This is why early masonry repair is always more affordable than waiting for structural problems to grow.
Signs Your Home Needs Tuckpointing
Brick structures usually show warning signs before major failure occurs. Knowing what to look for can help you avoid costly repairs later.
Cracked Mortar Joints
Hairline cracks between bricks are one of the earliest signs of deterioration. Even small openings can allow water to penetrate the wall system.
Crumbling Mortar
If mortar feels soft, sandy, or falls apart easily, the joints are losing strength and should be repaired soon.
Loose Bricks
Weak mortar can no longer hold bricks securely in place. This may cause sections of the wall to shift or lean slightly.
White Staining on Brick
White powdery residue, known as efflorescence, usually indicates excessive moisture movement through masonry surfaces.
Interior Water Damage
Peeling paint, damp walls, and mold growth near brick surfaces may signal failing mortar joints outside the home.
Chimney Deterioration
Chimneys often develop masonry damage faster because they are exposed to weather from every direction.
Why Chimneys Often Need Repairs First
Many homeowners first notice masonry problems around the chimney. That’s because chimneys face constant exposure to rain, snow, wind, and temperature changes.
Over time, moisture weakens the mortar joints and creates openings that allow even more water to enter. If ignored, chimney damage can eventually lead to:
• Leaning brick sections
• Water leaks near fireplaces
• Loose mortar pieces
• Structural instability
• Interior ceiling stains
Professional chimney tuckpointing helps restore the stability of the structure while preventing additional moisture damage.
Tuckpointing vs Repointing
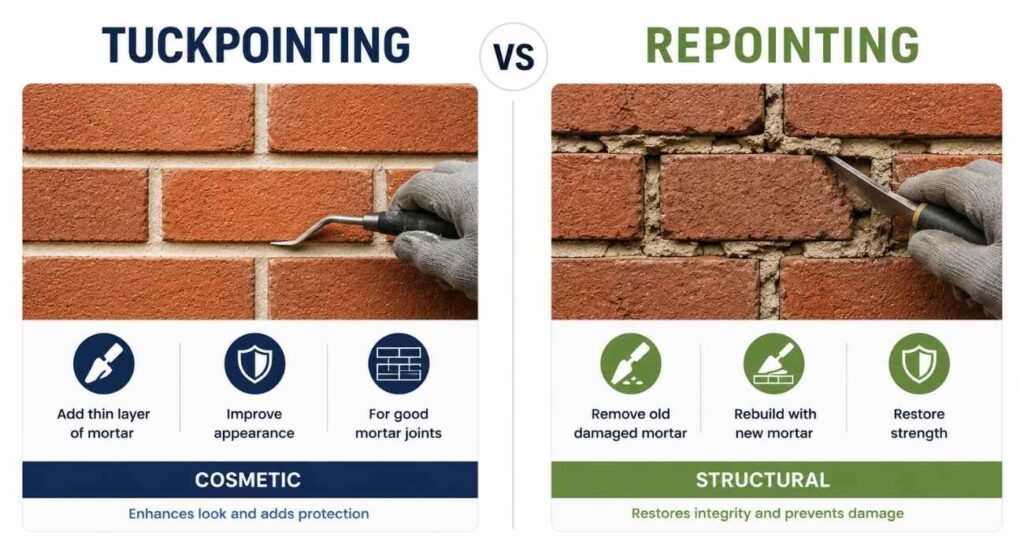
These two terms are often used interchangeably, but there is a slight difference between them.
Repointing mainly focuses on replacing damaged mortar for structural repair. Traditional tuckpointing also includes decorative finishing techniques that improve the appearance of mortar joints.
Today, most contractors use the term tuckpointing for general mortar restoration work.
| Feature | Tuckpointing | Repointing |
|---|---|---|
| Purpose | Structural + cosmetic repair | Structural repair |
| Appearance Focus | Higher | Moderate |
| Mortar Finish | Decorative detailing possible | Standard finish |
| Common Use | Visible brick facades | General masonry repair |
For most homeowners, the most important factor is repairing the mortar before moisture damage spreads further.
What Causes Mortar Joints to Fail?
Mortar damage usually develops gradually over many years. However, certain conditions speed up deterioration much faster.
Moisture Exposure
Water is the leading cause of masonry damage. Constant exposure slowly weakens mortar and allows cracks to develop.
Freeze-Thaw Cycles
When trapped moisture freezes, it expands inside the mortar joints. This repeated pressure causes cracking and separation.
Aging Materials
Even high-quality mortar eventually wears down with time and weather exposure.
Poor Drainage
Overflowing gutters and improper drainage systems increase moisture around masonry walls and foundations.
Foundation Movement
Small shifts in the foundation place stress on brick walls and mortar joints.
Incorrect Previous Repairs
Using the wrong mortar mixture can actually damage brick structures, especially older homes.
How Professional Tuckpointing Works
Many homeowners underestimate how technical proper masonry restoration can be. A rushed repair may look acceptable initially but fail within a few years.
Professional contractors follow a careful process to ensure long-lasting results.
1. Masonry Inspection
The contractor checks for:
• Cracked joints
• Loose bricks
• Water damage
• Structural movement
• Chimney deterioration
A full inspection helps determine how severe the damage really is.
2. Removing Old Mortar
Damaged mortar is carefully removed using specialized tools. This step requires precision because aggressive grinding can permanently damage bricks.
3. Cleaning the Joints
Dust and debris are cleaned out so the new mortar bonds properly with the masonry.
4. Applying New Mortar
Fresh mortar is packed into the joints in layers. Experienced contractors carefully match:
• Mortar color
• Texture
• Density
• Joint style
Proper matching helps maintain the original appearance of the brickwork.
5. Finishing and Curing
Once applied, the mortar is shaped and allowed to cure slowly. Proper curing is important because mortar that dries too quickly may crack prematurely.
How Much Does Tuckpointing Cost?
The cost of mortar joint repair depends on several factors, including wall size, accessibility, moisture damage, and the condition of the brickwork.
Small repairs may cost a few hundred dollars, while larger restoration projects can cost several thousand.
Average Cost Breakdown
| Repair Type | Estimated Cost |
|---|---|
| Minor Brick Repair | $500–$1,500 |
| Exterior Wall Tuckpointing | $5–$25 per sq. ft. |
| Chimney Repair | $800–$3,500 |
| Historic Brick Restoration | $10–$40 per sq. ft. |
| Commercial Masonry Repair | Varies by project |
Several factors affect pricing:
• Building height
• Amount of deterioration
• Brick condition
• Accessibility
• Moisture damage
• Historic restoration requirements
Delaying repairs usually increases the overall cost because the damage continues spreading over time.
DIY vs Professional Tuckpointing
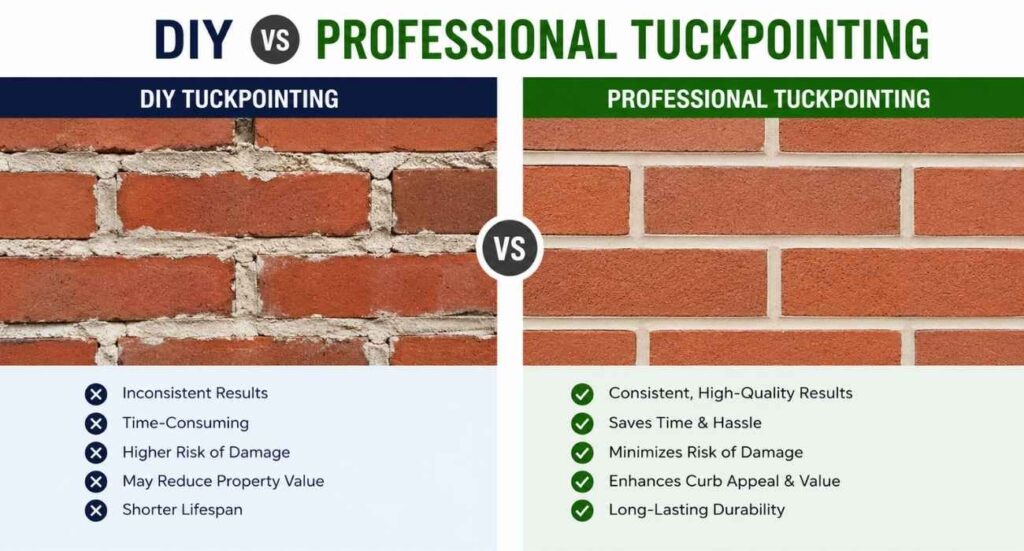
DIY masonry videos often make mortar repair look simple. In reality, proper restoration requires specialized tools and experience.
Many homeowners accidentally damage brickwork by:
• Using incorrect mortar mixtures
• Grinding too aggressively
• Applying mortar improperly
• Trapping moisture inside walls
• Ignoring structural movement
Professional masonry contractors understand how brick systems handle moisture, pressure, and expansion. That expertise plays a major role in how long the repair lasts.
Historic Brick Homes Need Special Care
Historic homes require a completely different restoration approach than modern construction.
Older brick structures were often built using softer bricks and lime-based mortar. Modern cement mortar may appear stronger, but it can actually crack historic bricks because it prevents natural movement.
This is why professional brick restoration is so important for older properties.
Experienced contractors know how to:
• Match historic mortar
• Preserve original brickwork
• Use compatible materials
• Prevent future cracking
• Maintain architectural value
Improper repairs on historic masonry can permanently damage the structure.
How to Prevent Future Masonry Damage
While mortar naturally wears down over time, proper maintenance can greatly extend the life of brick structures.
Keep Gutters Clean
Overflowing gutters allow water to run directly down masonry walls.
Schedule Annual Inspections
Small cracks are much easier and cheaper to repair early.
Avoid Pressure Washing
High-pressure washing can weaken mortar joints and force water deeper into the wall.
Fix Drainage Problems
Poor drainage near foundations increases long-term moisture exposure.
Repair Small Cracks Quickly
Early repairs help prevent larger structural problems later.
Is Tuckpointing Worth It?
For most homeowners, the answer is yes.
Professional masonry restoration helps protect the structure, improve appearance, and prevent expensive water damage. Compared to major reconstruction work later, repairing deteriorating mortar early is usually much more affordable.
Well-maintained brickwork can also:
• Increase property value
• Improve curb appeal
• Extend building lifespan
• Reduce moisture problems
• Prevent loose bricks and cracks
Ignoring damaged mortar almost always leads to larger repair costs over time.
Frequently Asked Questions
How long does tuckpointing last?
Professional repairs typically last between 20 and 30 years depending on climate conditions and maintenance.
Can damaged mortar cause leaks?
Yes. Moisture entering through cracked joints can eventually damage drywall, insulation, and interior walls.
Is tuckpointing only cosmetic?
No. It plays a major role in protecting structural stability and preventing water intrusion.
When should chimney mortar be repaired?
As soon as cracking, loose joints, or missing mortar becomes visible.
Can I do masonry repair myself?
Small cosmetic repairs may be manageable, but larger restoration projects should usually be handled professionally.
Final Thoughts
Most masonry problems don’t begin with major structural failure. They start with small cracks, minor moisture intrusion, and slowly weakening mortar joints. The problem is that water damage spreads much faster than most homeowners expect once moisture enters the wall system.
Professional tuckpointing helps stop that process early. Whether you’re dealing with chimney deterioration, cracked mortar, or aging brickwork, timely masonry restoration can protect both the appearance and structural integrity of your property for years to come.
If you notice cracked mortar joints, loose bricks, or water damage around your masonry, scheduling a professional inspection early can save you significant repair costs in the future.
Have Questions? Call NuEra Contracting Today!
📞 347-444-9028
We’re here to help with expert construction, brickwork, roofing, and waterproofing services. Get reliable solutions, friendly support, and professional results for your next project.